Friday, May 17, 2013

IE Slow or freezes.

Solve the problem ie slow or freezes because it is old versions
Click -----

 update internet explorer8download finish install as follows

Internet Explorer 8
double clicks install program
Internet Explorer 8
click as I do not want to participate right now

finish click as Next >
Internet Explorer 8
click I accept
Internet Explorer 8
click  Install updates  and click Next >
Internet Explorer 8
This step is to download and install software on your computer.

It takes about 10-15 minutes.
Internet Explorer 8
Appear on the screen indicating that the installation program has finished.

Click Restat now (recommended) restart the first time.

When enabled, the program first. Is displayed, set the frame work of this nature.
Internet Explorer 8

click Next

Internet Explorer 8
In this screen, click Yes, turn on Suggested Sites button, and then click Next.
Internet Explorer 8
select Use express settings and then click Finish At the end of this process. The candidate will be completely unavailable.

Thursday, May 16, 2013

disable microsoft account or facebook account link in skype account

main remove microsoft account or facebook account  leave  skype account
select  skype ----- account


watch at  your skype name  ----- select  profile details


 select  account settings
select  microsoft account or facebook account to change

Monday, May 13, 2013

share wifi hotsport win7

How to Configure WiFi Hotspot in Windows 7 Using Command Prompt

What is a WiFi Hotspot?

A WiFi Hotspot is a Wireless hub which offers a network access to various devices over a wireless medium using routers. It requires a particular software which gives the ability to host a Hotspot in our computer. In order to reduce the difficulty, it’s better to establish a WiFi Hotspot using Command Prompt.
In the 21st century, the utilization of the internet is increasing day by day. At the same time, sharing of resources on the Internet has been triggered between Wireless Routers or Mobile WiFi Hotspots. If you are away from your home network and do not access to your internet connection, you will probably require some of your friends or colleagues internet to share their network access and connect through a common gateway. And that’s what we call a “WiFi Hotspot“.
Read the below steps clearly and start your own WiFi Hotspot.

Step 1:

  • Select Command Prompt(Admin) in your computer.
  • Command: Windows key() + X

Step 2:

  • Check whether your computer is supported for Hosted network or not. Type the following command in Command Prompt.
  • Command : netsh wlan show drivers

If the result is “YES” then proceed to Step 3 or else download the required drivers from your vendor website.

Configuring the Hosted network connection:

Step 1:

  • Type “netsh wlan set hostednetwork mode=allow ssid=yourname key=yourpassword” (enter the command without the quotations).
  • Note: In this example, I have used my own user Name and Password. You can use your own parameters for SSID and KEY and Password must be greater than 8 digits.

You have successfully established the Network Connection.

Step 2:

  • Start your hosted network.
  • Command : netsh wlan start hostednetwork
If your Command Prompt says ” your hosted network couldn’t be started ” then make sure to turn on the “WiFi” and also enable the Wireless Adapter :)

When there is no error:

Sharing your Wireless Network Adapter

Step 1:

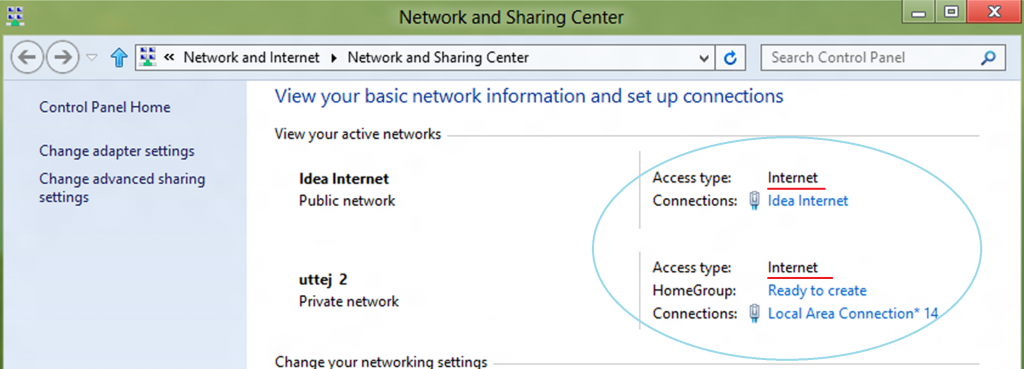
  • Go to control Panel -> Network and Internet and select Network and Sharing Center.

Step 2:

  • There you can see your newly created network under the original network connection.

Step 3:

  • Select “Change adapter settings” in the left side column of Network and Sharing Center.

Step 4:

  • Right click on your Wireless Network Adapter and select properties. Select the tab “Sharing“. Check the option “Allow other network users to connect through this internet’s connection” option. Mention your newly created hosted network name.

Step 5:

  • Check whether your hosted network has shared the network access or not from the Network Sharing and Center.

  • Wahoooo!! You have successfully turned on your WiFi Hotspot. Now you can surf internet from any device using the Hotspot.

Saturday, May 11, 2013

download skype for windows

Download Skype For Free

The new Skype version introduces the one feature that most people really wanted: group video calling. Thanks to this new function, you will be able to have a video call with up to four people at the same time, while keeping the same excellent image quality were used to in Skype.
download skype now


Thursday, May 9, 2013

share printer in windows 7 no password

How To Share A Printer In Windows 7 Without Password

 
If you are finding it difficult to share a printer on your Microsoft Windows 7 PC with other computers on the network here is a simple guide to make things working, configuring Windows 7 security settings as described below will let you share printers from any operating system on the network without requiring a username and password.
Windows 7 Printer Sharing Access Denied
The most common reason for windows 7 printer sharing not working problem is that Windows 7 requires you to enter a username and password to provide access, you can simply bypass this requirement my tweaking settings as described below.
  1. Launch Windows 7 Control Panel
  2. Navigate to Network and Sharing Center
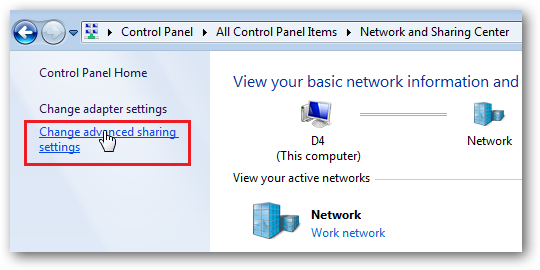
  3. Click Change advanced sharing settings link as shown below.
  4. Windows 7 Network Printer Setup
  5. Scroll down and make sure File and Printer sharing option is turned on.
  6. Scroll down further below and select Turn off password protection option from Password protected sharing setting.
  7. Turn Off Printer Sharing Password
  8. Click Save changes button to save the new configuration and close the page.


Fixing Network Access Denied Error On Windows Computers


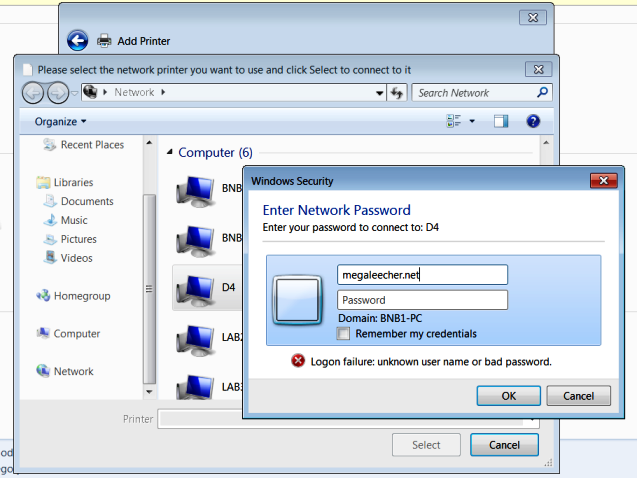
\\computer name is not accessible. You might not have permission to use this network resource. Contact the administrator of this server to find out if you have access permissions.

Logon failure: user account restriction. Possible reasons are blank passwords not allowed, logon hour restrictions, or a policy restriction has been enforced.


SNAGHTML127e72fe
 
Goto Windows Start Menu -> Run, typin regedit and press Enter key to launch
 Windows Registry Editor.
 
 
Navigate to - HKEY_LOCAL_MACHINE/SYSTEM/CurrentControlSet/Control/Lsa
  • Change value of key restrictanonymous to 0.
  • Reboot computer to apply change.
  •  


    Wednesday, May 8, 2013

    Gmail settings for forwarding, POP and IMAP

    All the three options - forwarding, POP and IMAP - can be enabled via the Gmail account settings.

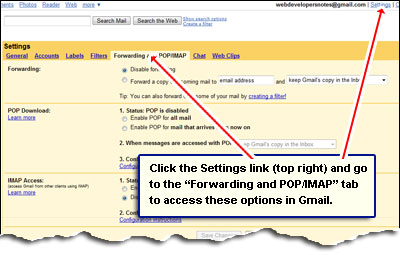
    Click on the Settings link located at the top right. Now go to the Forwarding and POP/IMAP tab - refer image below.
    The Gmail settings sections with options for Forwarding messages, POP and IMAP for downloading emails


    configure your outlook gmail account

    How to configure your Outlook GMail account

    dots Why should I use Outlook for my Gmail address?

    Although the web based system of Google Gmail is one of the most feature rich webmail platforms, you may want to handle your Gmail account & messages from a client email software program such as Microsoft Outlook. For example, if you are using other email addresses and not just the Gmail account, most likely you would want to read and handle all your email accounts from the same interface & program.

    dots Configuring the Outook Gmail settings.

    You can configure Outlook to handle your Gmail account as a POP3 or as an IMAP account. Depending on your choice, you have to enable the related account option in your Gmail account (Gmail Settings -> Forwarding and POP/IMAP).
  • Below, we will detail how to setup Microsoft Office Outlook 2000 to 2010 to send, receive and store email messages for a Gmail address. Before getting started, please make sure you know your Gmail email address and your Gmail password.
  • Start Outlook: from the main Outlook window, go to Tools -> Email Accounts.
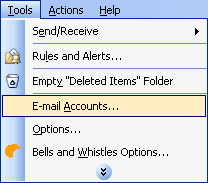
    selecting the Outlook email accounts for Gmail
    On the Outlook popup window, select to "Add a new e-mail account" and click on Next.
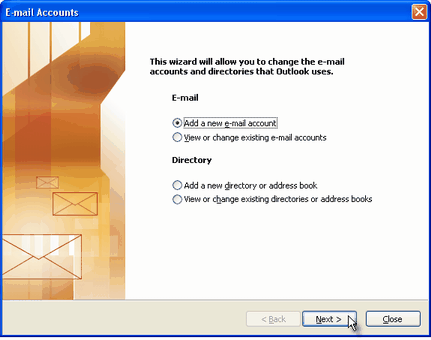
    Outlook add email account
    On the server type step, select POP3 or IMAP (depending on your needs) for the Outlook email account type, then click on Next. There is no need to select the IMAP type, because the Gmail web based account will anyway keep a copy of all emails, just like an IMAP account would do.
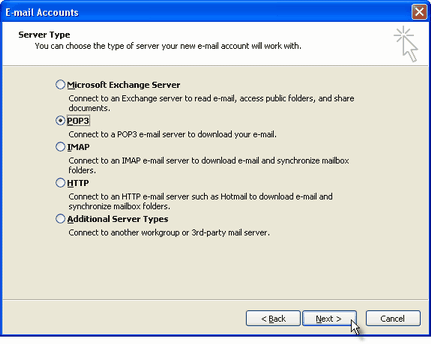
    gmail pop3 for outlook
    On the next screen, you will have to specify your Outlook Gmail settings, such as your Gmail username and password, Gmail server addresses, Gmail server ports and Outlook Gmail display name.
  • On the User Information section, enter your Name (it can be anything, but remember this is going to be the name/text that people will see when you will send them an email via your Outlook Gmail account) and your Gmail email address.

  • On the Server Information section, enter the Google Gmail servers:

    POP Gmail servers for Outlook:
    - Incoming mail server: pop.gmail.com
    - Outgoing mail server: smtp.gmail.com.

    IMAP Gmail server for Outlook:
    - Incoming mail server: imap.gmail.com
    - Outgoing mail server: smtp.gmail.com.

    As an alternative, you may setup any other outgoing mail server that you have access to, such as your ISP's SMTP server or your own hosted outgoing server. However, if you setup a 3rd party outgoing mail server, you will not have access to sent emails via your web based Gmail account panel.

  • On the Logon Information section, enter your Gmail User Name (which is the same as your Gmail email address) and your Gmail password. Tick the box "Remember password" in order to make Outlook to store the Gmail password, so it will not ask you about it every time when Outlook will send/receive emails for the Gmail account.

  • Click on the "More Settings" button and go to the "Advanced" window tab.

    If you use Gmail as a POP Outlook account:
    - On the "Incoming server (POP3)" field, enter 995 and mark the box "This server requires an encrypted connection (SSL)";
    - On the "Outgoing server (SMTP)" field, enter 465 and mark the box "This server requires an encrypted connection (SSL)".

    If you use Gmail as an IMAP Outlook account:
    - On the "Incoming server (IMAP)" field, enter 993 and mark the box "This server requires an encrypted connection (SSL)";
    - On the "Outgoing server (SMTP)" field, enter 587 and mark the box "This server requires an encrypted connection (TLS)".

    For both POP and IMAP, you also have to enable the option "My outgoing mail server requires authentication" from the Outgoing Server tab.

    You can also change the server timeouts period: this defines the time interval for which Outlook will wait to establish a Gmail connection, before triggering a connection error. The slower your Internet connection is, the greater period you should put.
    The "Delivery" options are not important for an Outlook Gmail account: no matter what you would change here, Gmail will always keep a copy of each email on the Gmail server.
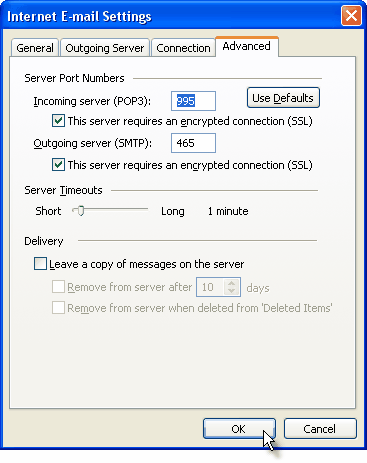
    outlook gmail servers
    When you are done setting up your Outlook Gmail advanced settings, click on OK to return to the Outlook Gmail account window.
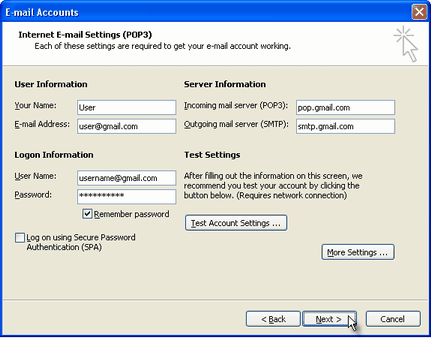
    gmail for outlook
    To verify your Outlook Gmail setup, click on the "Test Account Settings" button: this will make Outlook to attempt to login to your Gmail account and to send & receive an Outlook test email. If the test will succeed, you will notice the test email in your Outlook Inbox folder. If the test fails, Outlook will prompt you with the error messages - most likely, you didn't setup the correct server settings or the Gmail password is wrong.
  • Monday, May 6, 2013

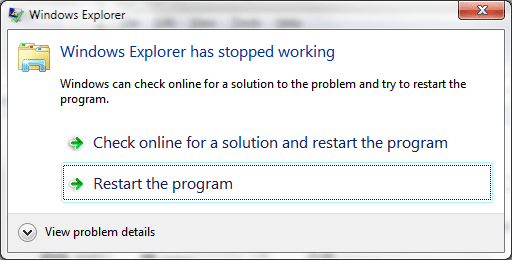
    Windows Explorer Has Stopped Working Problem

    The actual error messages that appears will be similar to this:

    windows 7 error

    There are multiple reasons for why Windows Explorer or Installer could be locking up, so we have listed some possible solutions below:

    Before You Proceed:

    1. First thing you should always do is make sure your exact PC manufacturer drivers are updated to their latest versions! Outdated PC drivers cause a lot of Windows errors and updating your network devices can fix most Windows Internet connection problems. You can either search the manufacturer’s websites and download/install all your current drivers, or you can run a recommended driver update program that will find and update them for you.
    I personally use DriverFinder to ensure all my Windows device drivers are up-to-date.
    2. After ensuring your drivers are updated, REBOOT your computer and make sure you are still experiencing the crash before going on to the possible solutions section.

    Solutions For “Windows Explorer Has Stopped Working” Error:

    Option 1. Run CHKDSK
    • Go to the Start button.
    • In the Search box, type “cmd” (without quotes) and press Enter.
    • At the command prompt, type “chkdsk /r /f” (without quotes) and press Enter.
    • Reboot your computer.
    NOTE: You might receive an error message that states:
    “Access denied as you do not have significant privileges. You have to invoke this utility in elevated mode.”
    If you receive the above error message, it means you are not logged into you computer as an Administrator. If that’s the case, follow these steps to run the command prompt in elevated mode:
    • Go to theStart button.
    • Go to “All Programs > Accessories” and right click on “Command Prompt”.
    • Select “Run as Administrator”.
    • In the Search box, type “cmd” (without quotes) and press Enter.
    • At the command prompt, type “chkdsk /r /f” (without quotes) and press Enter.
    • Reboot your computer.
    Option 2. Tweak IE Options
    • Open Internet Explorer.
    • Go to “Tools > Internet Options > Advanced Tab”.
    • Uncheck “Enable third-party browser extensions”.
    • Click “Apply”.
    • Reboot your computer.
    Option 3. Machine Throttling
    • Go to the Start button.
    • In the Search box, type “regedit” (without quotes) and press Enter.
    • Look for the following registry key: “HKEY_LOCAL_MACHINE\SOFTWARE\ Microsoft\ SQMClient\Windows\DisabledSessions”.
    • On the right window pane, delete the subkey: “Machine Throttling”.
    • Reboot your computer.
    Make sure you try the options in order and only move to the next option if your are still receiving the “Windows Explorer or Installer Has Stopped Working” error message.